- Home
-
Tiles
- Brick Look Tiles >
- Concrete Look Tiles >
- Steel Look Tiles >
-
Decorative Tiles
>
- 3D Feature Tiles >
- Aged, Worn & Antique Look Tiles
- Capping, Listello and Pencil Tiles
- Chevron Tiles
- Embossed Feature Tiles
- Feature Tiles
- Fish Scale Tiles
- Floral Tiles >
- Flute Tiles
- Geometric Tiles >
- Herringbone Tiles
- Kit Kat Look Tiles
- Lantern Tiles
- Penny Round Look Tiles
- Popsicle Look Tiles
- Retro & Funky Look Tiles
- Tessellated Tiles
- French Pattern Tiles >
-
Hand Made Look Tiles
>
-
Square - Hand Made Look Tiles
>
- Beige - Square Hand Made Look Tiles
- Black - Square Hand Made Look Tiles
- Blue - Square Hand Made Look Tiles >
- Colour - Square Hand Made Look Tiles
- Green - Square Hand Made Look Tiles >
- Grey Scale - Square Hand Made Look Tiles
- Patterned - Hand Made Look Tiles
- Pink - Square Hand Made Look Tiles
- Red - Square Hand Made Look Tiles
- Terracotta - Square Hand Made Look Tiles
- White - Square Hand Made Look Tiles
- Yellow - Square Hand Made Look Tiles
-
Subway - Hand Made Look Tiles
>
- Black - Subway Hand Made Look Tiles
- Blue - Subway Hand Made Look Tiles >
- Colour - Subway Hand Made Look Tiles
- Green - Subway Hand Made Look Tiles >
- Grey Scale - Subway Hand Made Look Tiles
- Pink - Subway Hand Made Look Tiles
- Red - Subway Hand Made Look Tiles
- Terracotta - Subway Hand Made Look Tiles
- White - Subway Hand Made Look Tiles
- Yellow - Subway Hand Made Look Tiles
-
Square - Hand Made Look Tiles
>
-
Marble Look Tiles
>
- Neutral & Plain Tiles >
-
Pattern Tiles
>
- 3D Look - Pattern Tiles
- Aged, Weathered and Worn - Pattern Tiles
- Black & White - Pattern Tiles
- Circular - Pattern Tiles
- Colonial & Heritage - Pattern Tiles
- Geometric - Pattern Tiles
- Made to Order - Pattern Tiles >
- Mediterranean & Moroccan - Pattern Tiles
- Modern & Contemporary - Pattern Tiles
- Multi Pattern - Pattern Tiles
- Star Shape - Pattern Tiles
- Terrazzo Look - Pattern Tiles
- Wall Only - Pattern Tiles
-
Stone Look Tiles
>
- Actinolite & Chlorite - Stone Look Tiles
- Black - Stone Look Tiles
- Bluestone - Look Tiles
- Bronzite - Stone Look Tiles
- Dark - Stone Look Tiles
- Decorative - Stone Look Tiles >
- Granite - Stone Look Tiles
- Ivory - Stone Look Tiles
- Light - Stone Look Tiles
- Limestone Look - Stone Tiles >
- Sandstone - Look Tiles
- Slate - Look Tiles
- Washed - Stone Look Tiles >
- Weathered Stone Look Tiles
- White - Stone Look Tiles
-
Subway Tiles
>
- Arrowhead - Subway Tiles
- Bevelled - Subway Tiles
- Black - Subway Tiles
- Blue - Subway Tiles >
- Brown - Subway Tiles
- Colour - Subway Tiles
- Concrete - Look Subway Tiles
- Decorative - Subway Tiles
- Embossed - Subway Tiles
- Green - Subway Tiles >
- Grey - Subway Tiles >
- Ivory & Beige - Subway Tiles
- Lookalike - Subway Tiles
- Pattern - Subway Tiles
- Purple - Subway Tiles
- Orange - Subway Tiles
- Pink - Subway Tiles
- Red - Subway Tiles
- Travertine Look- Subway Tiles
- Weathered or Worn - Subway Tiles
- White - Subway Tiles >
- Talavera Tiles >
- Terracotta Tiles >
- Terrazzo Look Tiles >
- Timber Look Tiles >
-
Travertine Look Tiles
>
-
Mosaic Tiles
- Chevron Mosaic Tiles
- Feather Mosaic Tiles >
-
Finger | Kit Kat Mosaic Tiles
>
- Black - Finger | Kit Kat Mosaic Tiles
- Blue - Finger Mosaic Tiles >
- Colour - Finger | Kit Kat Mosaic Tiles
- Green - Finger Mosaic Tiles >
- Grey Scale - Finger or Kit Kat Mosaic Tiles
- Natural Stone - Finger | Kit Kat Mosaic Tiles
- Pink - Finger | Kit Kat Mosaic Tiles
- White - Finger | Kit Kat Mosaic Tiles
- Fish Scale | Scallop | Mermaid | Fan Mosaic Tiles >
- General | Mosaic Tiles
-
Geometric Mosaic Tiles
>
- Black - Geometric Mosaic Tiles
- Blue & Green - Geometric Mosaic Tiles
- Colour - Geometric Mosaic Tiles
- Dark Marble Look - Geometric Mosaic Tiles
- Beige - Geometric Mosaic Tiles
- Metallic - Geometric Mosaic Tiles
- Pink, Red & Orange - Geometric Mosaic Tiles
- White - Geometric Mosaic Tiles
- White Marble Look - Geometric Mosaic Tiles
- White Marble Decorator Geometric Mosaic Tiles
- Glass Mosaic Tiles >
-
Herringbone Mosaic Tiles
>
- Black - Herringbone Mosaic Tiles
- Black Marble Look - Herringbone Mosaic Tiles
- Blue & Green - Herringbone Mosaic Tiles
- Colour - Herringbone Mosaic Tiles
- Pink & Red - Herringbone Mosaic Tiles
- Timber Look - Herringbone Mosaic Tiles
- White - Herringbone Mosaic Tiles
- White Marble Look - Herringbone Mosaic Tiles
- Lantern Mosaics
- Metallic | Mosaic Tiles
- Mosaic Tile Murals >
-
Penny Round Mosaic Tiles
>
- Black - Penny Round Mosaic Tiles
- Black Marble Look - Penny Round Mosaic Tiles
- Blue - Penny Round Mosaic TIles
- Colour - Penny Round Mosaic Tiles
- Green - Penny Round Mosaic Tiles
- Grey Penny Round Mosaic Tiles
- Metallic - Penny Round Mosaic Tiles
- Pink - Penny Round Mosaic Tiles
- White - Penny Round Mosaic Tiles
- White Marble Look - Penny Round Mosaic Tiles
- Pebble | Mosaic
- Stone & Marble Look Mosaic Tiles >
- Tessellated Mosaic Tiles
-
Pool Tiles
-
Pool Coping & Nosing Tiles
>
-
Pool Tile Mosaics
>
- Anti Slip - Pool Tile Mosaics >
- Black - Pool Tile Mosaics
- Blue Pool Tile Mosaics >
- Brown - Pool Tile Mosaics
- Colour - Pool Tile Mosaics
- Corner & Coving - Pool Tile Mosaics >
- Decorative - Pool Tile Mosaics >
- Glow in the Dark - Pool Tile Mosaics >
- Green - Pool Tile Mosaics >
- Grey - Pool Tile Mosaics
- Metallic - Pool Tile Mosaics >
- Murals - Pool Tile Mosaics >
- Pattern - Pool Tile Mosaics
- Pink - Pool Tile Mosaics
- Orange - Pool Tile Mosaics
- Red - Pool Tile Mosaics
- Stone Look Pool Tile Mosaics >
- White - Pool Tile Mosaics
- Yellow - Pool Tile Mosaics
-
Pool Coping & Nosing Tiles
>
- Pavers
-
Porcelain Slabs
- Hybrid Planks
- Laminate
- Vinyl
-
More Products
-
ABOUT US
- About
-
Services
>
- Architects
- Builders
- Colour Consult
- Home Owners
- Pool Builders
- Tilers
- Tile Selection
- Tile Specification
- Interior Designers
- Inspiration >
- Insurance Tiles
-
Tile Knowledge
>
-
After Installation
>
- Before Installation >
- Blog
- Commercial Tile Guides >
-
FAQ
>
- Are Tiles Cold
- HOW MANY TILES SHOULD I ORDER?
- How to Match Existing Tiles
- What is the difference between glazed and unglazed porcelain tile?
- What Tile Grout Joint Should I Use?
- Why are some of my tiles uneven
- Why Are There Stains On My Polished Porcelain Tiles
- Why do my tiles have small cracks?
- Why Do My Tiles Appear Different To What Was Ordered
- Why Have I Received Wrong or Damaged Tiles
- Health & Safety
- Tile Applications >
-
Tile Facts
>
-
Tile Installation
>
- Tile Partners
- Tile Standards and Codes >
- Why Choose Tiles >
-
After Installation
>
- Careers
- Contact
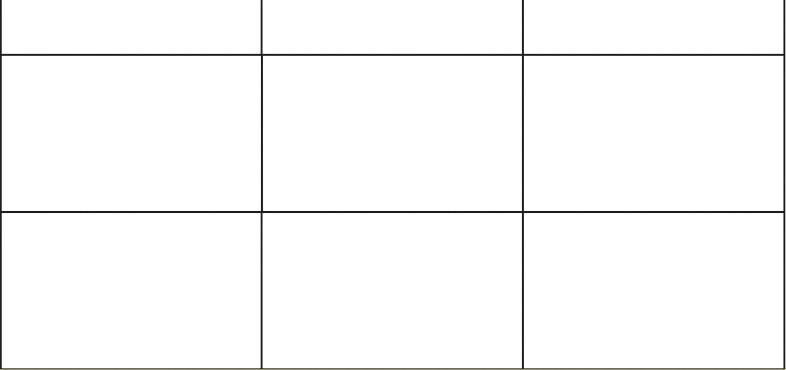
Straight (or Stack Bond)
Straight or stack bond tile pattern is the most common and simplest tiling pattern in the world. This pattern has tiles installed in straight lines so that all the grout joints look like a grid. This means the corners of each tile are lined up with each other which provides a simple, clean and at the same time modern appearance.
The straight lay tiling pattern is the most versatile layout option for tiles. It can be used for any room, floor, wall or space both indoors and outdoors. It is also the most cost efficient and affordable option as it is the easiest for tilers to lay and has the least amount of wastage when cutting.
When tiling in a straight or linear tile pattern we recommend allowing 10-20% extra for cuts and breakages depending on the space you are installing tiles.
Remember that different batches may have slight colour variation that will show up in the finish product. Straight lay tile patterns will show different batches so make sure you check the batch number on the packaging of your tiles.
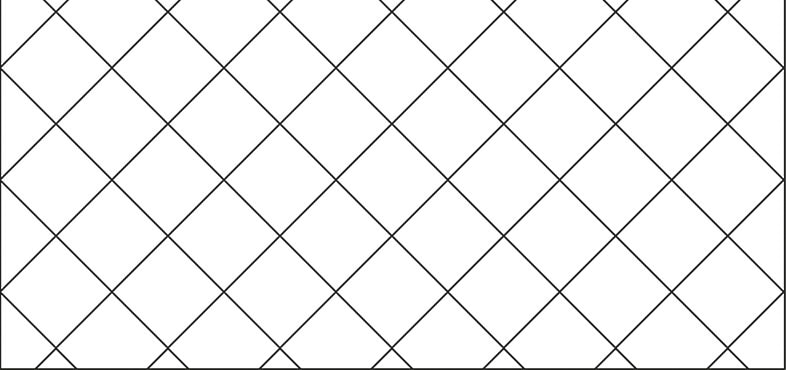
Diagonal
The diagonal tile layout pattern is very similar to the straight pattern with one minor difference, the tiles are installed on a 45 degree angle by turning square tiles into diamonds. If you are looking to make a room feel bigger or stretch it out, no layout pattern is more effective than the diagonal pattern. This is because when you look at the pattern, your attention is drawn or focused on the widest part of the tiles while at the same time the eyes will see the grout lines spreading across the width of the room at wide angles. This mathematical and visual trick of perception makes you think you are looking at a space that is much larger.
This tile layout pattern is perfect for floors in entryways, hallways and small bathrooms as well as in the shower. These are all spaces that tend to be smaller or narrower than the rest of the home.
This tile layout pattern is perfect for floors in entryways, hallways and small bathrooms as well as in the shower. These are all spaces that tend to be smaller or narrower than the rest of the home.
Herringbone
The herringbone tile layout pattern feels like it has exploded into fashion in recent years becoming one of the fast growing and most popular tile layout patterns, particularly for feature walls and small room floors.
The herringbone pattern is perfect for hallways or outdoor paths because the 'V' pattern that it creates acts like arrows pointing you in the right direction. However it is important not to confuse the herringbone tile pattern with the Chevron pattern, they are distinctively different.
To create the herringbone pattern, lay any type of rectangular tile in a zig zag pattern. This is done by taking any sized rectangular tile and turning one so that the two are perpendicular to each other, align them along one side and repeat. This will basically create a repeating L-shape with each two tiles installed.
The herringbone tile layout pattern also helps in making rooms appear larger than they seem. This is because the eyes focus on the V shape instead of the narrowness of a room. By focusing on the pointing arrows a space can appear long and large.
If you are laying tiles in a herringbone layout we recommend that you allow at least 20% for extra cuts and breakages because more cutting is involved.
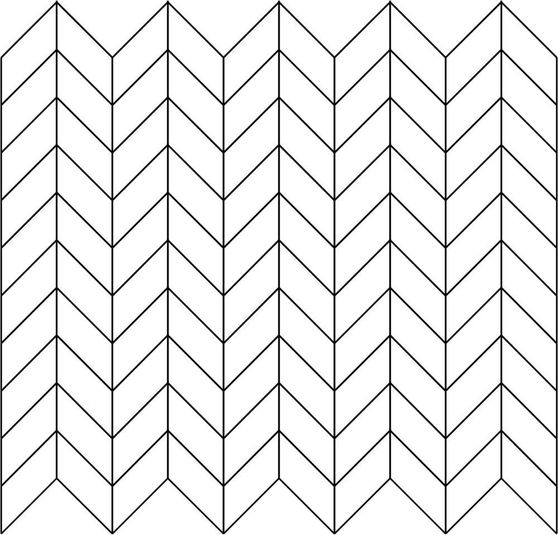
Chevron
The Chevron tile pattern is very similar to the herringbone pattern when explained so it is important to understand their distinct characteristics to avoid any confusion. The confusion is compounded by the fact that the Chevron pattern is often referred to as French Herringbone.
Both the Chevron and Herringbone patterns are described as a zig-zag visual. The difference can be subtle, but you only have to miss-specify it once to realize how significant the difference really is.
In a Chevron pattern, the zig-zag creates an exact “V”. The ends of two equally sized tiles are cut at an angle and fitted together to create a point. The opposite ends of the tiles are cut similarly, so the detail is created across the floor or wall.
In contrast to the herringbone tile pattern, the ends of the tiles are not cut and the square edge of the rectangle tile adjoin the side or length of the other tile.
Because we are cutting the ends of each tile instead of laying them at a 90 degree angle like in the herringbone. We recommend that you allow a little extra for cuts and breakages when laying in a Chevron tile pattern.
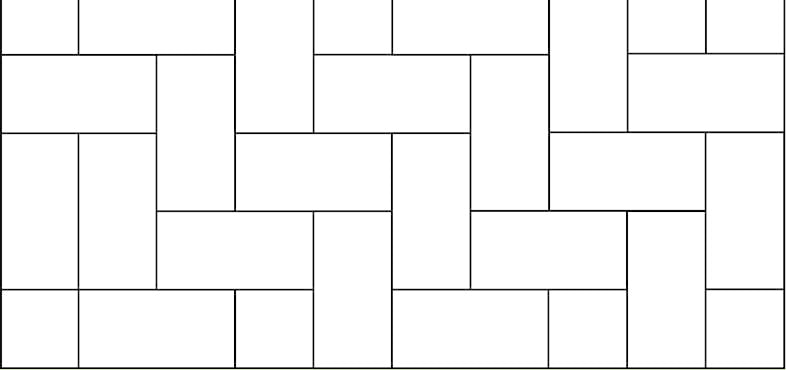
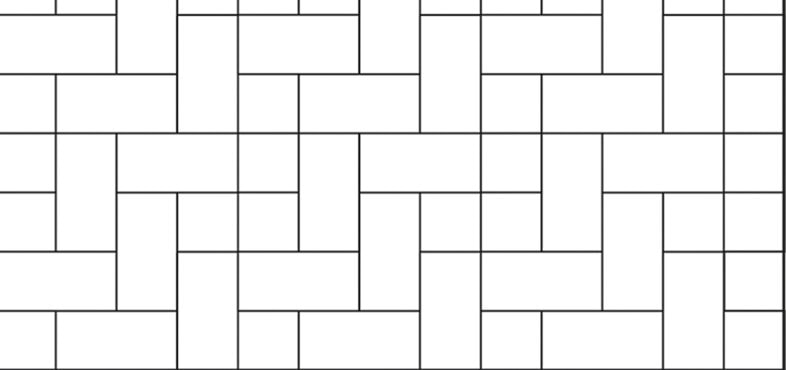
Basket Weave
The weave. The basket weave is often used in applications where the design is aimed at creating a chic feel out of the early nineteen hundreds. Think traditional styled homes with intricate natural stone textures in the hallways, outdoor entertainment areas and foyers.
However the weave can be modern and transitional at the same time. The colours and pattern you choose will greatly determine how successful this pattern will be.
The weave is created using rectangular tiles. Simply place two tiles next to each other to form a square and then another pair of tiles laid at 90 degrees to the first pair. Then continue and alternate to repeat the pattern as you go. This will give the impression that the tiles are woven over and under each other like a basket.
We recommend allowing at least 10-20% extra for cuts and breakages with this tile pattern.
Windmill
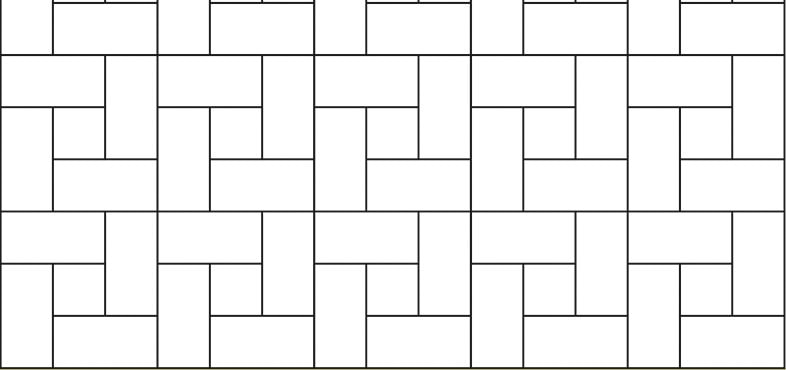
One of the most retro and intricate looks you could choose for a tile is the Windmill tile layout pattern. It is difficult to install and a complicated pattern that really pays off.
The simplest way to explain the windmill tile layout pattern is to break it up into individual square shapes. In each square there are four rectangular tiles and one small square tile placed right in the middle. The rectangular tiles circle the square tile to create the larger square shape.
Hot tip, use a small square tile with a different colour in the middle to the rectangle tiles to make this pattern stand out.
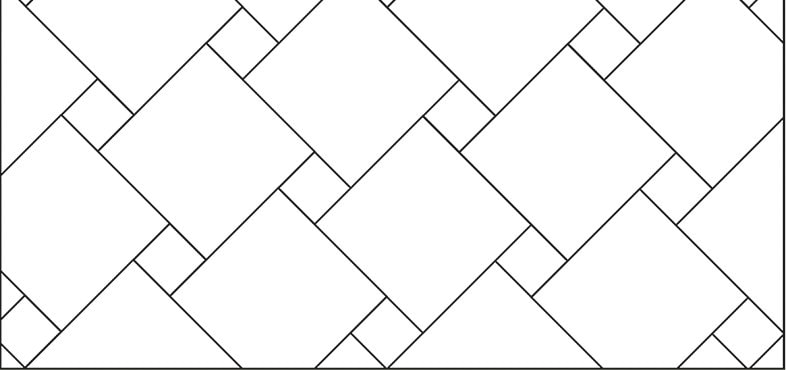
Pin Wheel (also called Hopscotch)
The pin wheel tile pattern is very similar to the windmill pattern. This design will use a small square tile surrounded by larger format square tiles to create the effect of a spinning wheel.
We recommend using contrasting small and larger format square tile colours to create a stunning design.
Although this design is not overly complicated it is important to plan it carefully and employ a tiler with decent skills. It is not a very common design which makes it difficult to install but unique and wonderful to look at.
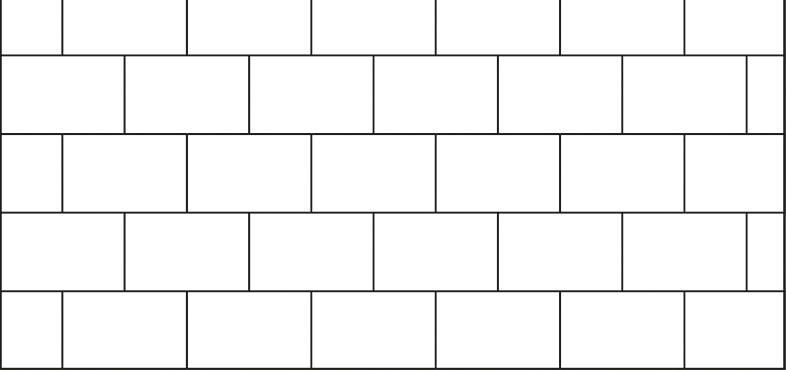
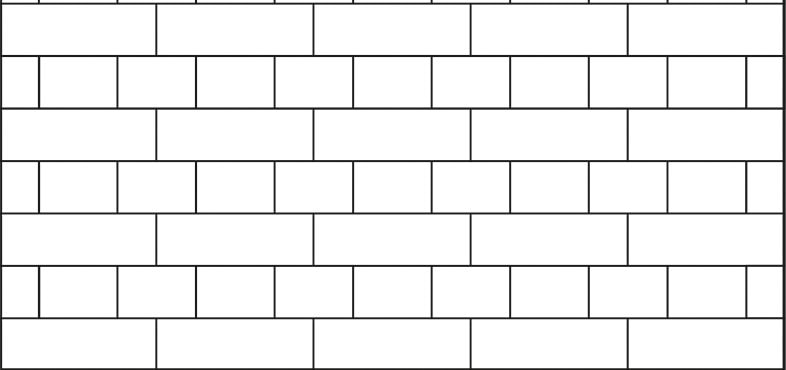
Stretcher Bond
Stretcher Bond or brick bond layouts are very popular with rectangular tiles. To plan the layout just align the end of each tile with the centre of the tiles that are directly below and above it. This will create a staggered brick laying look.
We recommend thinking about using this tile layout pattern when installing rectangular tiles on the floor and any rectangular shaped tiles on the wall, especially subway tiles.
Please allow at least 15% extra for cuts and breakages when laying stretcher bond or brick bond tile layouts as they do tend to have a few extra cuts when the pattern reaches walls.
Cobblestone
Not commonly seen but more common with traditional themed homes where the natural stone and granite look tiles are used.
The cobblestone tile layout pattern employs rectangular tiles laid in the herringbone format. In addition, around the edges of the herringbone format we have smaller square tiles which create a larger pattern. Sounds complicated and expect to have additional costs from a tiler when installing, it takes time but really looks stunning when installed.
The cobblestone tile layout pattern employs rectangular tiles laid in the herringbone format. In addition, around the edges of the herringbone format we have smaller square tiles which create a larger pattern. Sounds complicated and expect to have additional costs from a tiler when installing, it takes time but really looks stunning when installed.
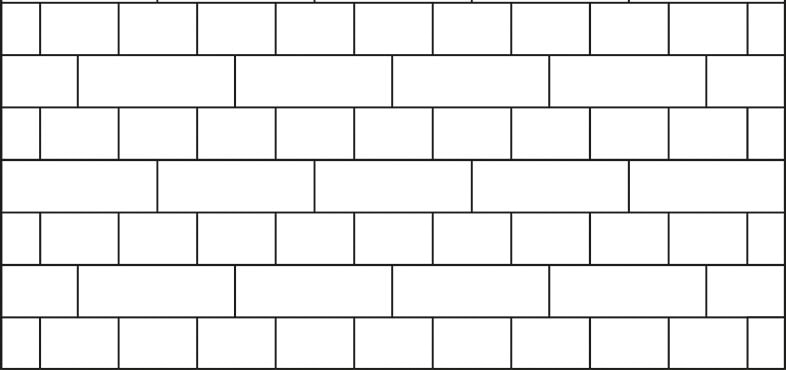
English Bond
It would seem odd to have two different tile shapes laid in a brick bond or stretcher bond tile layout. However that is exactly what the English Bond pattern is.
The English Bond pattern uses alternating rows of rectangular and square tiles. The square tiles are centered on the rectangles and the ends of all the tiles line up between the rows.
This pattern is great for creating continuity throughout the home by taking your floor or wall tile onto the wall and vice versa.
English Cross Bond
Similar to the English bond except that the rectangular tiles in the alternating rows are staggered like the pattern in a stretcher bond.
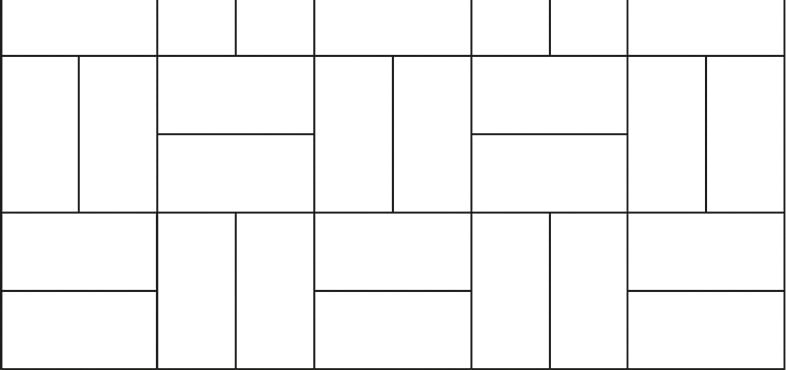
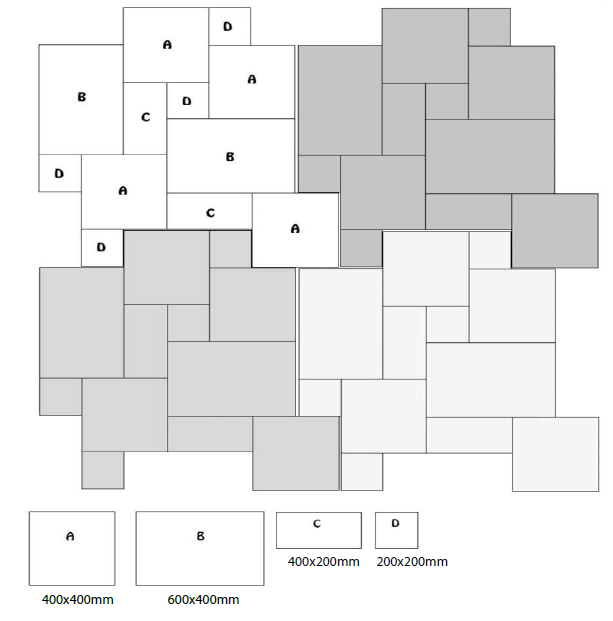
French Pattern
A difficult tile layout pattern to explain so it is best illustrated with the image above.
Sold by the set (metric sizing) 0.72m2. Each set contains 2 pieces of A and D and 1 piece of B and C. However you could also find different sized tiles in the same design and install the in the layout shown.
Sold by the set (metric sizing) 0.72m2. Each set contains 2 pieces of A and D and 1 piece of B and C. However you could also find different sized tiles in the same design and install the in the layout shown.
(07) 5596 1916
83 Lawrence Drive Nerang QLD 4211
Showroom Opening Hours
Monday - Thursday |
8:00 AM - 5:00 PM |
Friday |
8:00 AM - 4:30 PM |
Saturday |
8:30 AM - 12:00 PM |
Sunday |
CLOSED |
Public Holidays |
CLOSED |
You'll be smiling, doing your tiling, when you shop at
Most awarded Queensland Tile Showroom
Experience the beauty and quality of Nerang Tiles - the leading tile supplier on the Gold Coast.
Our wide range of high-quality tiles, including mosaic, swimming pool, marble look, concrete look, hand-made look, and more, are perfect for adding a touch of elegance and style to any room in your home or commercial space. We provide tile selection, design and sample services for all your tile needs. Contact us today and let us help you transform your space. Follow us on social media for the latest tile trends and inspiration. Proudly serving the Gold Coast and Brisbane.
Voted Best Tile Showroom, Nerang Tiles hosts one of the largest Australian tile showrooms displaying thousands of floor tiles and wall tiles at discount prices at its Gold Coast Tile Showroom.
The Nerang Tiles Website is a gallery snapshot only. Displaying a sneak preview of the thousands of tiles on display at its Gold Coast Tile Showroom. Visit in store to see the full range and take advantage of the Nerang Tiles expert team.
Nerang Tiles is a one stop tile showroom, providing colour and design consultation to assist builders, architects, retail and interior designers tile all areas from floors, walls, bathrooms, kitchens, pools, outdoor areas, offices to driveways.
Showcasing the latest in tile design and interior tile trends, including all classic and traditional tile designs, Nerang Tiles has it all. Some of the tiles available include tiles suitable as kitchen tiles, bathroom tiles, floor tiles, wall tiles, outdoor tiles, pool tiles, feature tiles and much more.
Tile Types available at Nerang Tiles: Bathroom Tiles, Kitchen Tiles, Pool Tiles, Outdoor Tiles, Wall Tiles, Floor Tiles, Feature Tiles, Timber Look Tiles, Marble Look Tiles, Stone Look Tiles, Concrete Look Tiles, Pattern Tiles, Mosaic Tiles, Stone Veneer Cladding, Cladding Tiles, Brick Look Tiles, Subway Tiles, Talavera Tiles, Capping Tiles, Listello Tiles, Pencil Tiles, Vinyl Tiles, Safety Tiles, Geometric Tiles, Tessellated Tiles, Mercatto Tiles, Terracotta Tiles, Anti Slip Tiles, Commercial Tiles, Textured Tiles, Sealed Tiles, Structured Tiles, Scored Tiles, Pressed Edge Tiles, Rectified Tiles, Vitrified Tiles, Step Tread Tiles, Coving Tiles, Bullnosed Tiles, Glazed Tiles, Bejmat Tiles, Zellige Tiles, Kit Kat Tiles, Finger Tiles, Unglazed Tiles, Floral Tiles, French Pattern Tiles, Terrazzo Look Tiles, Glow in the dark Tiles, Glass Tiles, Encaustic Tiles, Mosaic Tile Murals, Pool Mosaic Murals, Porcelain Paver Tiles and much more.
You are sure to be smiling doing your tiling when you shop at Nerang Tiles.
Find more tile inspiration for your wall tiling or floor tiling through the Nerang Tiles' Pinterest Page, Instagram Page, Houzz Profile or Facebook Page. The Nerang Tiles Social Media pages are constantly updated with new tiles arriving in store and designed inspiration from tile factories and customers for our viewing pleasure.
*Photos are an indication of colour only. Actual goods may vary from images shown due to device display settings, product batch variations and fine detail, and may not be available. Please contact Nerang Tiles to check availability, request samples or view display items .
Information on this website is to be used as a guide only and should not be taken to constitute current professional advice or a formal recommendation and we exclude all representation and warranties in relation to the content of this website. All consumers should seek professional advice through their local Builder's Association for specific, current and individual application.
