|
Introducing the Celleni Aluminium Linear Floor Grate. Create luxurious spaces with this stylish and functional linear grate. Perfect for your indoor or outdoor wet area, this grate comprises the newest technology available for floor grate at an affordable price.
FEATURES & BENEFITS
SPECIFICATIONS Colour: Silver Finish: Brushed Material: Aluminium Watermark: 022370 DIMENSIONS Length: 5600mm Width: 71mm Depth: 23mm Waste: 40mm or 50mm WARRANTY Lifetime: Rustproof Warranty
0 Comments
Any rectangular tile can be laid in a herringbone pattern and guess what? The herringbone pattern is just as easy to lay as any other pattern, it is just more time consuming. However the end result is definitely worth the patience and time as the pattern can make any ordinary subway tile or wood plan style tile look completely different. Whether your tiling an entire floor, feature wall, kitchen splashback or a small niche, Nerang Tiles has revealed the top five questions we get asked about the herringbone tile pattern. Where should I start the herringbone pattern? It really depends on the look you are after. If you would like your tiled area to be symmetrical, which is often the most aesthetic look, then you will need to locate the centre of the tiling area and begin from there. This will ensure that your herringbone patter will look the same on either end of a wall or square floor space. However if you would like to make sure that you have no cut tiles at one of the edges of your floor or wall, then you should start from that side. This method will not reduce the number of tiles that you will have to cut to complete a herringbone pattern, but it will give you control over the sides of the floor or wall tiled space that will be cut. Which way should the pattern run? When tiling a herringbone pattern, standard rule of thumb is that each rectangular tile is laid at 90 degree to the tile next to it, creating what the experts refer to as a “fish bone” pattern that also resembles a set of arrows or triangles. 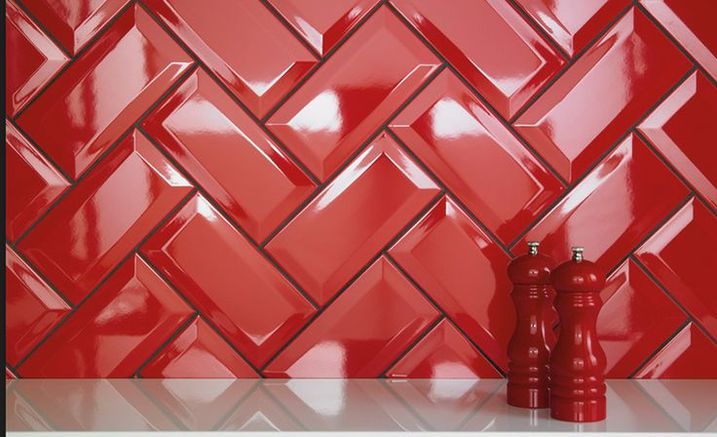 What grout should I use to complete the herringbone pattern? This is completely up to your personal taste and the design that you are after. Most often, a colour grout that blends in with the colour of the tiles is chosen. However you can create a very distinctive herringbone pattern by choosing a contrasting grout colour that will frame your tile pattern. Which tiles need to be cut in a herringbone pattern? This depends on the area that you are tiling. We recommend that you lay your tiles without adhesive (glue or hot wax) before laying or cutting the tiles. This way you can see which tiles need to be cut to fit into the space. Once you have identified which tiles need to be cut you can then mark them up with a marker and cut away. All cuts should be done at 45 degrees. Is there a cheaper or easier way to lay a herringbone pattern? Yes there is. If you are not prepared to spend the time to lay the herringbone pattern yourself, or the price quotes for laying the pattern is too high, why not try a mosaic sheet that already comes in a herringbone pattern? 
Long gone are the days when the tiler only offered White, Off-white or Grey as the only colour options for grout. He would have a proprietary white wall grout and / or site mix local sand with the three colours of cement for floor grouting. If he was a stone fixer he might have added some pigment to keep some of the more demanding customers happy. Tiles were not as much a fashion item as they are today and choice of style and colour was very limited.
As tiles became more popular and competition drove the need to be different, fashion and colour became important characteristics to differentiate, excite and grow its usage. The rise in tile variety and colour has naturally driven a rise in the popularity of coloured grouts. This has seen many manufacturers produce and promote a myriad of grout colour palette’s to please the most discerning. However this rise in popularity of coloured grouts by customers and designers has not been matched by any similar popularity with many tilers and stone fixers. For them it has meant coming to terms with seemingly more time consuming fixing practices and an even more demanding client, as almost any variation in colour is deemed unacceptable these days and the responsibility of the fixer or grout manufacturer. At times, even colour variation resulting from suspect grout selection practices. So what are some of the reasons for perceived or actual colour variation with cement grouts and how do we go about satisfying our consumer? Firstly, it has to be recognised grout colours shown on grout colour cards, chip clips, swatches, website and other tools are generally only colour replicas as accurate as the technology used, can reproduce. Absolute reliance on a colour selection made in a showroom with a coloured swatch and one or two tiles is generally always going to lead to disappointment. Secondly, the effect that lighting can have on the appearance of a grout installation is profound. The angle of light, type of light, quality of light, and source of light all play key roles in how the grout will appear. It is not unusual for grout to appear as one colour during the day and as a different colour during the night. It is also not unusual for one batch of grout, used on both a floor and a wall to have different colour based on the angle of light hitting these surfaces. Wall washing lighting is especially notorious for creating drastic visual variations in grout appearance and I haven’t even started on how adjacent or background colours, like those of the tile, influence the perception of the grout colour. Significantly, as well affecting the actual tile / grout installation, this variation of colour or perception of colour difference can be just as profound at the time of colour grout selection – possibly resulting in an unsatisfactory colour grout choice. Meaning, this design or selection and sampling process needs to be managed from the onset to deliver a realistic understanding of what to expect and ensure a satisfactory and known outcome. So after the selection process, verify actual appearance and compatibility with a test area on site before installing. It is really the only practical way to understand and overcome sample and lighting variation that will affect the final outcome. Next – Colour variation is inherent with any cement based grout. There are many variables which can affect the final colour of the grout and following are some of the areas the fixer needs to consider during the installation. Amount of water used in mixing – the use of too much water when mixing the grout can cause the grout to dry lighter than anticipated. Excess water dilutes the colour pigment concentration and will often cause the grout to be lighter in colour. Excessive amounts of water or any water based gauging liquid can also lead to the increased chance of efflorescence which invariably bonds to the surface causing the grout to look lighter in colour. Excessive or varying amounts of water to clean grout – The use of too much water during the cleanup process can wash out some of the colour pigments in the grout, also causing the grout to dry lighter than anticipated. Too much water used to clean the grout may also lead to efflorescence issues. Use a consistent amount of water in the sponge and clean the grout with the same techniques throughout the installation. Changing the cleaning water frequently will also help achieve the best results. Adhesive high in the joint – a common problem with grout being uneven in colour is the tile adhesive (often grey in colour) not being cleaned out of the joint during the tile or stone installation process. If the adhesive is left too high in the joint then a light or medium coloured grout may appear darker in colour than it should. The higher the adhesive is left in the joint, the darker the discolouration will appear. It is very important to ensure that any excess adhesive be removed from the joint during the installation of the tile or stone, or while the adhesive is still wet. Varying density of tile and stone can cause cement grouts to hydrate unevenly and thereby cause an inconsistent (blotchy) grout colour, upon drying. For example, a ceramic tile that has only two edges glazed, or a porous natural stone such as marble, can draw moisture from the cement grout, often times very quickly and differently. In some cases, the same batch of cement grout may potentially dry two different colours depending on the type of tile or stone around which it is installed due to varying absorption rates. Installations where different types of stone are used, or where tile and stone are used, may show variation in grout colour based solely on differences in tile absorption rates. The modern polymer modified grout performs far better with these conditions that the older standard unmodified types. Type of substrate – the substrate over which tile or stone are installed can also play a significant part in the final colour of the cement grout. As an example: highly absorbent substrate. The moisture in the grout is drawn into the substrate which means that there is less water for the curing process of the grout. If the grout is not able to mature with the proper amount of water then the colour may very well be lighter than what is expected. To help prevent this from happening, it may be necessary to dampen (leave no standing water) with clean, potable water and a sponge over the tile installation just before grouting. This will add moisture to the substrate thereby lowering the absorption rate. Dampening the surface will also clean and cool the tile or stone. As always, it is best to conduct a test area whenever possible to verify results and confirm acceptability. Using different manufacturers’ lot (batch) numbers in the same area, without dry blending all of the grout powder first, can cause the grout to appear different shades where the first batch of grout stops and the new batch(s) starts. When a different lot number (usually found on the bottom of the bags or above the bar code) is used, remember to mix them together dry in a clean container in order to maintain a consistent colour and always follow the manufacturer’s written instructions for mixing and slaking of cement grouts, prior to grouting. Jobsite conditions – on many large jobs there are many factors which can have a significant effect on the installation of the grout. Exposure to wind, sunlight or other heat sources or any condition which can cause uneven drying may affect how the grout will appear when fully cured. For example, a grout job that is in direct sunlight can dry at a faster rate than an installation in a shaded area, thus causing a colour variation in the cement grout colour. A Portland cement based grout will appear darker in colour when it is wet, even after full cure, in the same way that a footpath appears darker in colour when it rains. Controlling jobsite conditions or protecting the grout from exposure to damage should be mandatory to prevent unsightly, contaminated grout.Following the manufacturer’s instructions and being mindful of the above should guarantee a good and consistent grout installation, and ensure that customer expectations regarding colour selection are met. Credit: Tile Today magazine ApplicationsRecommended areas for usage include kitchen backsplashes, accent walls, shower and tub surrounds, and pool or spas. Glass cannot be installed on the floor as it can fracture when exposed to extreme weights and is vulnerable to scratching Glass mosaic tile sheets can be used in various techniques to enhance your project:
Due to the inherent variables associated with mosaic tile product manufactured utilising natural stone, glass and metal materials, it is strongly recommended that consultation with your preferred supplier is undertaken prior to installing with regards to the following:
Installation and care recommendations Adhesive: Apply a white thin set mortar with a flexible acrylic additive using a v notch trowel typically 3/16 x 5/32 x 3/16. Spread the adhesive evenly on the wall to avoid seeing the thin set notch marks from showing through the glass. Then, carefully set the tiles, mesh side down, into a place and tap the glass with a beating block or the back of a rubber grout float. Blend from various cartons to achieve a consistent variation. Use a level periodically to check your horizontal and vertical grout joints to keep them straight during the installation.
Spacing: to ensure a consistent grout joint, use a spacer the same size as the grout joint in the mosaic tile usually either 1/8 or 1/16. Grout: after 24 hours, mix and apply grout following the manufacturer's instructions. Use an unsanded grout on all glass tiles to prevent scratching. Clean all excess grout immediately with a damp sponge. After 12 hours, polish off any remaining grout haze with a dry cloth or towel. Cutting: a wet saw with diamond blade designed to cut glass is recommended. Cut the glass mosaic with the meshed side up. For intricate cuts too small for the wet saw, glass nipper can be used. Cleaning: Use a soft, clean cloth with warm water or a non abrasive acid free household cleaner. All types of tiles, no matter the size, shape, colour or where they come from are all very versatile and differ depending on the time they are made. As all types of tiles are made of different materials and are available in a variety of colours, textures, shapes and sizes, it is critical that you select the right tile for your bathroom, kitchen or entire home.. you have to live with it after all.
Why are tile showrooms important? First of all, a tile showroom will give you the opportunity to inspect what the tiles really look like. Online shopping and catalogs are sometimes a convenient and efficient way of viewing the great number of tiles available on the market, but photos and catalogs never do a tile justice and sometimes can look completely different in real life. You may have a difficult time visualising a tile in its actual appearance and dimensions because online photos may not have a full range of the variations the tile comes in. You get access to experts. At Nerang Tiles we ensure each and every customer understands their options and leaves the showroom with a knowledge-base of tiles, understanding the range of tiles that are available, how they are made, where they come from and what visual and structural effect particular tiles will have on the area they wish to tile. This ensures that you make the right decision when picking your tile. Visiting a showroom will also allow you to judge the tile on its face value. Seeing something in real life allows you to not only see the tile but touch it too. The feel of a tile is extremely important. Why? You will be walking on it and if it does not feel good, you will never have that 'homey' feel when you arrive home and kick of your shoes to walk around your house. Tiles come in a range of different finishes, from matt, lappatto, polish, polish glaze and non-slip outdoor tiles. Some tiles even come with 3D textures and wood grain like prints so that they look and feel like natural stone, timber or even vinyl. It is crucial that you inspect a tile for its face value in a showroom so that you can make sure the tiles is perfect for the area you are placing it in. There are so many more benefits of a tile showroom and actually visiting and seeing the range of tiles displayed for your convenience around you. It allows you to view so many tiles at once, be reassured that you have experts assisting you and get a feel and visual critique of the tile you wish to lay in your home or commercial premises. At Nerang Tiles, we provide an award winning experience at an award winning showroom. There are actually a significant number of benefits to laying large tiles in comparison to smaller tiles, however both have their disadvantages and advantages depending on the area that is to be tiled. If you are considering laying large format tiles, typically 60 x 60 cm tiles or larger, it is apparent that they are better suited to large open spaces, where less cutting and grout is required.
We recommend laying large format tiles in areas such as hallways, dining rooms, hotel lobbies, outdoor patios, residential kitchens and any large commercial spaces such as shopping malls and car parks. The popularity of large format tiles are growing rapidly, with some smaller tiles becoming extinct as the larger tile replace them. This is due to the promotions of a large and very open look that large format tiles provide. Although the installation of large format tiles are sometimes more time consuming for tilers than the traditional 30 x 30 tiles, they cannot be beaten for their aesthetics, ease of maintenance, minimal grout, functionality and appeal. So what are the benefits? Nerang Tiles has compiled a list of benefits of format tiles that we think you should consider. For further information and to see the tiles in real life, please visit our award winning showroom at 83 Lawrence Drive, Nerang 4211. Luxury Appeal Long hallways and larger residential rooms have always been a representation of significant wealth and luxury. Large format tiles provide a seamless and continuous floor because they require less grout joints and ‘framing of tiles’, this allows you to visually lengthen the size of a room or floor space without compromising on a room’s design. Easier to Maintain Compared to smaller tiles such as 30 x 30 cm or even mosaics which require a significant number of grout joints on any floor or wall space, large shaped tiles provide an easier cleaning and maintenance option. With less grout joints comes less cleaning and risk of cracking or lipping of tiles. Open Space Feel If you are after a larger look for your main hall, lobby, room or kitchen then large format tiles are exactly what you should consider when designing a spacious floor plan. Smaller tiles can actually have the opposite effect and make a room feel over populated and smaller. The reason for this is because the more grout joints that are applied to a floor or wall which actually have a restrictive feeling that aesthetically bring the draw the walls closer together. In comparison, large format tiles can create a more open space for the reasons explained above. It is obvious why most luxury end commercial buildings and residential homes, as well as interior designers are always applying large format tiles to both the floor and walls of their premises. Choosing the right Tiles There are tiles for all environments however there is no one particular tile that is suitable for all situations. Wall and floor tiles perform two functions: an aesthetic, decorative function and a technical function in as much as they should be made from materials that can resist different types of environmental stress without breaking or deteriorating. These two functions are fundamental and essential; there cannot be one without the other. It is therefore essential that you choose a tile that is both aesthetically and technically suitable for your application. Are Tiles Slippery? There is no such thing as a non slip tile. There are many factors that contribute to a slip and fall, for example, the overall building design, contaminants on the tiles (including water), whether the person was running, walking, limping, etc., whether they were children or elderly, etc. Ceramic tiles are rated according to their contribution to the risk of a slip or fall. It is therefore recommended that you seek advice from the retailer as to the suitability of a particular tile for its intended use. The application and use of ceramic tiles is beyond the control of the supplier and it is therefore the end-user’s responsibility to manage the risk of slip and falls. Some simple actions you can take to manage slips and falls are the replacements of floor mats in entry ways and wet floor areas, strategic placement of handrails for the elderly and regular cleaning of pedestrian areas to prevent a build up of everyday contaminants and the immediate clean up of water or spillage that may occur on your tiles. Regulations All tiles must be laid in accordance with the Australian Building Code and the appropriate Australian Standards. A tile is only one component of a much larger building system that requires careful planning before the tiles are fixed. It is strongly recommended that you employ the skills of a licensed/qualified tiler to install your tiles. Ensure that you and the tiler have a written contract detailing the scope of work. Failure to do so has legal implications and may void any warranties. Prior to Installation
During Laying As tiling commences, make sure that the light in the room being tiled is as close as possible to the permanent lighting. Ensure the tiler mixes tiles from three or four different boxes so as to ensure proper blending of any colour variation that may exist. As the work progresses, take time to have periodic checks:
After LayingCleaning is the next step of the installation process. Ensure that the tiler removes all waxes, grout and grout residues. In the production of ceramic tiles, certain technical limitations will occur, which may manifest themselves in the form of minor marks and blemishes. The latter are generally considered a characteristic of the tile and not a defect. Under normal lighting conditions these characteristic marks may not be noticeable. However, they may become obvious when highlighted by some forms of oblique lighting, for example, halogen and high illuminate white lights. All tiled surfaces should be viewed from a distance of 1.5m under non-critical light. Further, make sure your expectations have been met by inspecting the finished job whilst the tiler is still on site. Mosaic Tiles Due to the technical limitations in the manufacturing process, mosaic tiles are subject to greater shade variations than other ceramic tiles. Ensure that you are happy with the colour and shade variation before installing the tiles. Suppliers will generally credit the tiles at this point in time however no claims can be made once the tiles have been installed. Polished Porcelain Tiles Polished porcelain tiles are different from other ceramic tiles in that they are unglazed. It is therefore recommended that (unless you are advised otherwise) these tiles should be sealed. Important note: Before sealing the tiles it is essential that all cementations and wax residues be removed from the tiles. Failure to do so will result in these contaminants being trapped below the surface of the sealer. OPTICAL HAZING: Whilst polished porcelain has a glossy surface, this does not mean it has the characteristics of a mirror. In fact, it is subject to a natural phenomenon known as optical hazing, presenting a smoky haze when the surface of the tile is struck by oblique light sources, for example early morning sun, halogen and white lights. The effects of optical hazing can be minimised by careful design planning, such as, the use of curtains and blinds, and the careful placement of furniture. Optical hazing is not considered a fault in the tile and does not affect the technical characteristics of the tile. Care & Maintenance It is recommended that ceramic tiles should be laid after all heavy construction has been completed and that the tiles be protected during construction as debris will collect on the floor creating hazardous conditions. Cementitious residues present on the tile surface should be cleaned with a grout cleaner. Do not use abrasive cleaners or chemicals, which could permanently scratch the surface of the tile. Daily cleaning with a mild detergent is best. If more rigorous cleaning is necessary use a proprietary tile and grout cleaner from a tile supplier. Daily Cleaning Guidelines
Disclaimer: This information is to be used as a guide only and should not be taken to constitute professional advice or a formal recommendation and we exclude all representations and warranties in relation to the content. All consumers should seek professional advice.
Ceramic tiles are one of the most popular and widely used flooring choices used in residential and commercial buildings throughout Australia and around the world. The Ceramic tile is also a popular choice for walls, back-splashes and more due to their range of colour, sizes and shape availability.
Ceramic tiles are not only beneficial for you, but beneficial or the environment as they are environmentally friendly, reducing household allergens and increasing your home's value. Practical, functional and beautiful all describe ceramic tiles. From the many sizes, shapes and textures, you’ll be amazed at all the choices you have for designing your dream floor, backsplash or wall. Read below to learn some more ceramic tile benefits. Benefits of Ceramic Tile
Ref: Networx |
- Home
-
Tiles
- Brick Look Tiles >
- Concrete Look Tiles >
- Steel Look Tiles >
-
Decorative Tiles
>
- 3D Feature Tiles >
- Aged, Worn & Antique Look Tiles
- Capping, Listello and Pencil Tiles
- Chevron Tiles
- Embossed Feature Tiles
- Feature Tiles
- Fish Scale Tiles
- Floral Tiles >
- Flute Tiles
- Geometric Tiles >
- Herringbone Tiles
- Kit Kat Look Tiles
- Lantern Tiles
- Penny Round Look Tiles
- Popsicle Look Tiles
- Retro & Funky Look Tiles
- Tessellated Tiles
- French Pattern Tiles >
-
Hand Made Look Tiles
>
-
Square - Hand Made Look Tiles
>
- Beige - Square Hand Made Look Tiles
- Black - Square Hand Made Look Tiles
- Blue - Square Hand Made Look Tiles >
- Colour - Square Hand Made Look Tiles
- Green - Square Hand Made Look Tiles >
- Grey Scale - Square Hand Made Look Tiles
- Patterned - Hand Made Look Tiles
- Pink - Square Hand Made Look Tiles
- Red - Square Hand Made Look Tiles
- Terracotta - Square Hand Made Look Tiles
- White - Square Hand Made Look Tiles
- Yellow - Square Hand Made Look Tiles
-
Subway - Hand Made Look Tiles
>
- Black - Subway Hand Made Look Tiles
- Blue - Subway Hand Made Look Tiles >
- Colour - Subway Hand Made Look Tiles
- Green - Subway Hand Made Look Tiles >
- Grey Scale - Subway Hand Made Look Tiles
- Pink - Subway Hand Made Look Tiles
- Red - Subway Hand Made Look Tiles
- Terracotta - Subway Hand Made Look Tiles
- White - Subway Hand Made Look Tiles
- Yellow - Subway Hand Made Look Tiles
-
Square - Hand Made Look Tiles
>
-
Marble Look Tiles
>
- Neutral & Plain Tiles >
-
Pattern Tiles
>
- 3D Look - Pattern Tiles
- Aged, Weathered and Worn - Pattern Tiles
- Black & White - Pattern Tiles
- Circular - Pattern Tiles
- Colonial & Heritage - Pattern Tiles
- Geometric - Pattern Tiles
- Made to Order - Pattern Tiles >
- Mediterranean & Moroccan - Pattern Tiles
- Modern & Contemporary - Pattern Tiles
- Multi Pattern - Pattern Tiles
- Star Shape - Pattern Tiles
- Terrazzo Look - Pattern Tiles
- Wall Only - Pattern Tiles
-
Stone Look Tiles
>
- Actinolite & Chlorite - Stone Look Tiles
- Black - Stone Look Tiles
- Bluestone - Look Tiles
- Bronzite - Stone Look Tiles
- Dark - Stone Look Tiles
- Decorative - Stone Look Tiles >
- Granite - Stone Look Tiles
- Ivory - Stone Look Tiles
- Light - Stone Look Tiles
- Limestone Look - Stone Tiles >
- Sandstone - Look Tiles
- Slate - Look Tiles
- Washed - Stone Look Tiles >
- Weathered Stone Look Tiles
- White - Stone Look Tiles
-
Subway Tiles
>
- Arrowhead - Subway Tiles
- Bevelled - Subway Tiles
- Black - Subway Tiles
- Blue - Subway Tiles >
- Brown - Subway Tiles
- Colour - Subway Tiles
- Concrete - Look Subway Tiles
- Decorative - Subway Tiles
- Embossed - Subway Tiles
- Green - Subway Tiles >
- Grey - Subway Tiles >
- Ivory & Beige - Subway Tiles
- Lookalike - Subway Tiles
- Pattern - Subway Tiles
- Purple - Subway Tiles
- Orange - Subway Tiles
- Pink - Subway Tiles
- Red - Subway Tiles
- Travertine Look- Subway Tiles
- Weathered or Worn - Subway Tiles
- White - Subway Tiles >
- Talavera Tiles >
- Terracotta Tiles >
- Terrazzo Look Tiles >
- Timber Look Tiles >
-
Travertine Look Tiles
>
-
Mosaic Tiles
- Chevron Mosaic Tiles
- Feather Mosaic Tiles >
-
Finger | Kit Kat Mosaic Tiles
>
- Black - Finger | Kit Kat Mosaic Tiles
- Blue - Finger Mosaic Tiles >
- Colour - Finger | Kit Kat Mosaic Tiles
- Green - Finger Mosaic Tiles >
- Grey Scale - Finger or Kit Kat Mosaic Tiles
- Natural Stone - Finger | Kit Kat Mosaic Tiles
- Pink - Finger | Kit Kat Mosaic Tiles
- White - Finger | Kit Kat Mosaic Tiles
- Fish Scale | Scallop | Mermaid | Fan Mosaic Tiles >
- General | Mosaic Tiles
-
Geometric Mosaic Tiles
>
- Black - Geometric Mosaic Tiles
- Blue & Green - Geometric Mosaic Tiles
- Colour - Geometric Mosaic Tiles
- Dark Marble Look - Geometric Mosaic Tiles
- Beige - Geometric Mosaic Tiles
- Metallic - Geometric Mosaic Tiles
- Pink, Red & Orange - Geometric Mosaic Tiles
- White - Geometric Mosaic Tiles
- White Marble Look - Geometric Mosaic Tiles
- White Marble Decorator Geometric Mosaic Tiles
- Glass Mosaic Tiles >
-
Herringbone Mosaic Tiles
>
- Black - Herringbone Mosaic Tiles
- Black Marble Look - Herringbone Mosaic Tiles
- Blue & Green - Herringbone Mosaic Tiles
- Colour - Herringbone Mosaic Tiles
- Pink & Red - Herringbone Mosaic Tiles
- Timber Look - Herringbone Mosaic Tiles
- White - Herringbone Mosaic Tiles
- White Marble Look - Herringbone Mosaic Tiles
- Lantern Mosaics
- Metallic | Mosaic Tiles
- Mosaic Tile Murals >
-
Penny Round Mosaic Tiles
>
- Black - Penny Round Mosaic Tiles
- Black Marble Look - Penny Round Mosaic Tiles
- Blue - Penny Round Mosaic TIles
- Colour - Penny Round Mosaic Tiles
- Green - Penny Round Mosaic Tiles
- Grey Penny Round Mosaic Tiles
- Metallic - Penny Round Mosaic Tiles
- Pink - Penny Round Mosaic Tiles
- White - Penny Round Mosaic Tiles
- White Marble Look - Penny Round Mosaic Tiles
- Pebble | Mosaic
- Stone & Marble Look Mosaic Tiles >
- Tessellated Mosaic Tiles
-
Pool Tiles
-
Pool Coping & Nosing Tiles
>
-
Pool Tile Mosaics
>
- Anti Slip - Pool Tile Mosaics >
- Black - Pool Tile Mosaics
- Blue Pool Tile Mosaics >
- Brown - Pool Tile Mosaics
- Colour - Pool Tile Mosaics
- Corner & Coving - Pool Tile Mosaics >
- Decorative - Pool Tile Mosaics >
- Glow in the Dark - Pool Tile Mosaics >
- Green - Pool Tile Mosaics >
- Grey - Pool Tile Mosaics
- Metallic - Pool Tile Mosaics >
- Murals - Pool Tile Mosaics >
- Pattern - Pool Tile Mosaics
- Pink - Pool Tile Mosaics
- Orange - Pool Tile Mosaics
- Red - Pool Tile Mosaics
- Stone Look Pool Tile Mosaics >
- White - Pool Tile Mosaics
- Yellow - Pool Tile Mosaics
-
Pool Coping & Nosing Tiles
>
- Pavers
-
Porcelain Slabs
- Hybrid Planks
- Laminate
- Vinyl
-
More Products
-
ABOUT US
- About
-
Services
>
- Architects
- Builders
- Colour Consult
- Home Owners
- Pool Builders
- Tilers
- Tile Selection
- Tile Specification
- Interior Designers
- Inspiration >
- Insurance Tiles
-
Tile Knowledge
>
-
After Installation
>
- Before Installation >
- Blog
- Commercial Tile Guides >
-
FAQ
>
- Are Tiles Cold
- HOW MANY TILES SHOULD I ORDER?
- How to Match Existing Tiles
- What is the difference between glazed and unglazed porcelain tile?
- What Tile Grout Joint Should I Use?
- Why are some of my tiles uneven
- Why Are There Stains On My Polished Porcelain Tiles
- Why do my tiles have small cracks?
- Why Do My Tiles Appear Different To What Was Ordered
- Why Have I Received Wrong or Damaged Tiles
- Health & Safety
- Tile Applications >
-
Tile Facts
>
-
Tile Installation
>
- Tile Partners
- Tile Standards and Codes >
- Why Choose Tiles >
-
After Installation
>
- Careers
- Contact

(07) 5596 1916
83 Lawrence Drive Nerang QLD 4211
Showroom Opening Hours
Monday - Thursday |
8:00 AM - 5:00 PM |
Friday |
8:00 AM - 4:30 PM |
Saturday |
8:30 AM - 12:00 PM |
Sunday |
CLOSED |
Public Holidays |
CLOSED |
You'll be smiling, doing your tiling, when you shop at

|
Most awarded Queensland Tile Showroom
Experience the beauty and quality of Nerang Tiles - the leading tile supplier on the Gold Coast.
Our wide range of high-quality tiles, including mosaic, swimming pool, marble look, concrete look, hand-made look, and more, are perfect for adding a touch of elegance and style to any room in your home or commercial space. We provide tile selection, design and sample services for all your tile needs. Contact us today and let us help you transform your space. Follow us on social media for the latest tile trends and inspiration. Proudly serving the Gold Coast and Brisbane.
Voted Best Tile Showroom, Nerang Tiles hosts one of the largest Australian tile showrooms displaying thousands of floor tiles and wall tiles at discount prices at its Gold Coast Tile Showroom.
The Nerang Tiles Website is a gallery snapshot only. Displaying a sneak preview of the thousands of tiles on display at its Gold Coast Tile Showroom. Visit in store to see the full range and take advantage of the Nerang Tiles expert team.
Nerang Tiles is a one stop tile showroom, providing colour and design consultation to assist builders, architects, retail and interior designers tile all areas from floors, walls, bathrooms, kitchens, pools, outdoor areas, offices to driveways.
Showcasing the latest in tile design and interior tile trends, including all classic and traditional tile designs, Nerang Tiles has it all. Some of the tiles available include tiles suitable as kitchen tiles, bathroom tiles, floor tiles, wall tiles, outdoor tiles, pool tiles, feature tiles and much more.
Tile Types available at Nerang Tiles: Bathroom Tiles, Kitchen Tiles, Pool Tiles, Outdoor Tiles, Wall Tiles, Floor Tiles, Feature Tiles, Timber Look Tiles, Marble Look Tiles, Stone Look Tiles, Concrete Look Tiles, Pattern Tiles, Mosaic Tiles, Stone Veneer Cladding, Cladding Tiles, Brick Look Tiles, Subway Tiles, Talavera Tiles, Capping Tiles, Listello Tiles, Pencil Tiles, Vinyl Tiles, Safety Tiles, Geometric Tiles, Tessellated Tiles, Mercatto Tiles, Terracotta Tiles, Anti Slip Tiles, Commercial Tiles, Textured Tiles, Sealed Tiles, Structured Tiles, Scored Tiles, Pressed Edge Tiles, Rectified Tiles, Vitrified Tiles, Step Tread Tiles, Coving Tiles, Bullnosed Tiles, Glazed Tiles, Bejmat Tiles, Zellige Tiles, Kit Kat Tiles, Finger Tiles, Unglazed Tiles, Floral Tiles, French Pattern Tiles, Terrazzo Look Tiles, Glow in the dark Tiles, Glass Tiles, Encaustic Tiles, Mosaic Tile Murals, Pool Mosaic Murals, Porcelain Paver Tiles and much more.
You are sure to be smiling doing your tiling when you shop at Nerang Tiles.
Find more tile inspiration for your wall tiling or floor tiling through the Nerang Tiles' Pinterest Page, Instagram Page, Houzz Profile or Facebook Page. The Nerang Tiles Social Media pages are constantly updated with new tiles arriving in store and designed inspiration from tile factories and customers for our viewing pleasure.
*Photos are an indication of colour only. Actual goods may vary from images shown due to device display settings, product batch variations and fine detail, and may not be available. Please contact Nerang Tiles to check availability, request samples or view display items .
Information on this website is to be used as a guide only and should not be taken to constitute current professional advice or a formal recommendation and we exclude all representation and warranties in relation to the content of this website. All consumers should seek professional advice through their local Builder's Association for specific, current and individual application.